
1. Setting Up#
The following walks you through setting up Python and the programming environment for this course. You will be installing the following on your personal computer:
OneDrive - A cloud-based file-hosting service maintained by Microsoft. As a Gettysburg student, you get a 1TB OneDrive account. OneDrive allows you to sync files between computers and access your files from any web interface. Your classwork should be stored in a OneDrive directory, safeguarding your work against any mishaps that might befall your personal computer.
Anaconda - a distribution of Python targeted to a scientific (and data scientific) user base. Anaconda installs with most of the scientific packages you should need for this course. Those that do not come prepackaged, we can add using conda (Anaconda’s package management utility).
VS Code - VS (Visual Studio) Code is a Microsoft IDE (Integrated Development Environment) that supports numerous programming languages. IDEs provide added functionality to improve your coding quality and productivity. VS Code is one of many available IDEs and my personal preference.
GitHub - Github is a version control/code sharing platform maintained by Microsoft. Problem sets will be distributed and submitted via GitHub Classroom.
If you already have a different Python installation and/or IDE set up on your computer, you do not need to additionally install the Anaconda package and VS Code. These are my recommendations for students starting out with these tools.
An Aside on File Systems
I recently came to realize a disconnect between how I grew up using (and understanding) computers versus how your generation uses and understands computers (an interesting article about it). For the entirety of your lives, computers have been searchable; files might reside anywhere on your computer and when you want a particular file or app, you ask for it.
As we move towards data science projects, it will become increasingly important to understand the computer’s file structure: how are files and folders organized on your computer, how do we describe/prescribe the path/location of a file or folder, and what are best practices to organizing files and folders for data science?
Folder structures are heirarchical
Your computer is organized as a tree of directories (aka folders) which contain files and other subdirectories (which in turn contain files and subdirectories). At the top of this tree is the root directory.
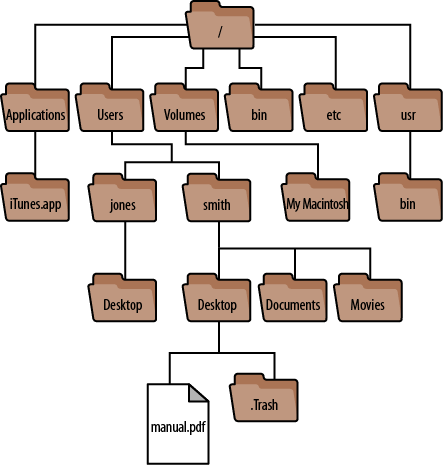
Fig. 1.1 An example folder heirarchy for MacOS. credit: Daniel J. Barrett#
The next layer of the tree comprises folders that store files related to how your computer works (files relating to your operating system, hardware, applications, network connectivity, installed fonts, etc.) You won’t need to go into these folders often, if ever.
The Users directory contains subdirectories for each user account on the machine and these user accounts have many of the folders you will likely interact with: Desktop, Downloads, Documents, Photos, Music, OneDrive etc.
The names of these folders suggest their intended uses. The Downloads folder is where downloaded files go. The Desktop is for your most frequently used folder, what you would keep out on your desk. Documents for documents, photos for photos, Music for music.
File Paths
For any file or folder, we can describe its location by tracing out the path we traverse on the tree. For example, in the image above, the file manual.pdf is in the Desktop folder in the smith folder in the Users folder in the root folder. We indicate the path taken through the folder heirarchy using ‘/’ (for MacOs and Linux) or ‘’ (for Windows). This path which describes the location of a file or folder is called…the path.
/Users/smith/Desktop/manual.pdf
(on Mac or Linux)
When you open/create/work on a file, it’s as if you are at the location of the file. When I open that pdf, that program will treat you as if it is working out of that location. That is the current working directory.
Absolute and relative file paths
When the path starts at the root directory (or the drive directory on Windows), we call this an absolute path. But most of the time, we want to describe the location of a file with respect to the current working directory. We call those relative paths. For example, if I were in the ‘smith’ directory, the relative path of the manual.pdf file would be:
Desktop/manual.pdf
There are some important file symbols that are important to know for relative paths:
. - the current path
.. - one folder up
../.. - two folders up
../../.. - three folders up, etc
Suppose I’m working from my Desktop and want to direct my code to find a file in the Documents folder. That relative path would be:
..\Documents\file_name.ext
Desktop and Documents are on the same level, so I had to take a step back out of the Desktop (to ‘smith’) and then back down into Documents.
Folder organization for Data Science
When you work on a project, you should contain it in a folder (preferably not your Downloads folder). In that project folder, you may want subfolders for Code, Data, Images, etc. In your code, you’ll often need to reference a path; for example when you need to save a figure or load data you tell your code where to save or where to look. You’ll want to use relative path naming. That way, when you share that project, another user can put that project folder where it makes sense to them and all the relative paths stay the same (even though the absolute path changes).
When you work on your project, I recommend you have a separate folder to store the figures and documents you create, separate from your code.
1.1. Setting Up Your Computer for Data Science#
If you have any of the following already, you should skip those steps. These instructions should get you up and running from a blank slate.
1.1.1. Anaconda#
Warning
For Mac Users If you are downloading Anaconda for Mac, be sure to select the GRAPHICAL installer that matches your CPU (Intel or Apple Silicon). If you don’t know which CPU your computer has, you can click the Apple icon in the upper left corner of your screen and select “About this Mac”; Intel Macbooks will say “Intel _____” and Apple Silicon Macbooks will say “Apple M”.
Run the Anaconda Installer.
1.1.2. OneDrive#
Run the OneDrive installer. OneDrive creates a local folder on your machine, the contents of which are synced to your OneDrive on the Cloud. The installer asks where you want this folder to be; if you don’t know or don’t care, the default is fine. Once the OneDrive directory is created, you should not move or rename the folder.
Find the OneDrive folder on your computer and create a new folder for this course, name it…say…’DS325’ or something similar. Avoid spaces in folder names (not a strict no-no but can cause headaches when coding).
Visit OneDrive.com and sign in with your Gettysburg College email. You should see the folder you created. Now your work is backed up on the cloud.
Warning
You MAY NOT work on any file that is in your Downloads folder. If Prof Roth sees you doing this, he will not help you and may further publicly shame you.
1.1.3. GitHub#
Go to github.com and create an account.
Edit your github profile to include your full name.
1.1.4. VSCode#
Download VSCode Select a .zip installer unless you are comfortable with working in a terminal using command line interface (CLI).
Warning
For Mac Users See the warning above under “Anaconda”.
Install VSCode.
1.1.4.1. Setting up VSCode for class#
VSCode is pretty nice right out of the box, but it has some useful (and necessary) extensions and settings you’ll want/need for this class.
First, we’ll change a setting so that VSCode opens in your Data Science folder by default. Open settings, (Ctrl+, on PC, Cmd+, on Mac) or through the top menu bar Code > Settings > Settings.
At the top of Settings is a search bar. Type “dialog default path”. You should see this:

Enter (copy and paste) the path for your DS325 directory (in your OneDrive!) into the text field. To get the path for that directory:
On PC, right-click on the folder you created and click “Copy as path”.
On Mac, right-click on the folder you created, and select “Get info”. This opens a pop-up with information about the file/folder you’ve selected. Near the top, there is a field named “Where”. Right-click this field and select “Copy Pathname”.
Hover your cursor to the left of the top-left corner and you should see a gear icon. Click the icon and select “Apply to all profiles”.
Next, we’ll install a few useful extensions. On the left-hand side of VSCode, you should see a stack of icons. Select the extensions tab (looks like stacking blocks). You’ll search for and install the following extensions:
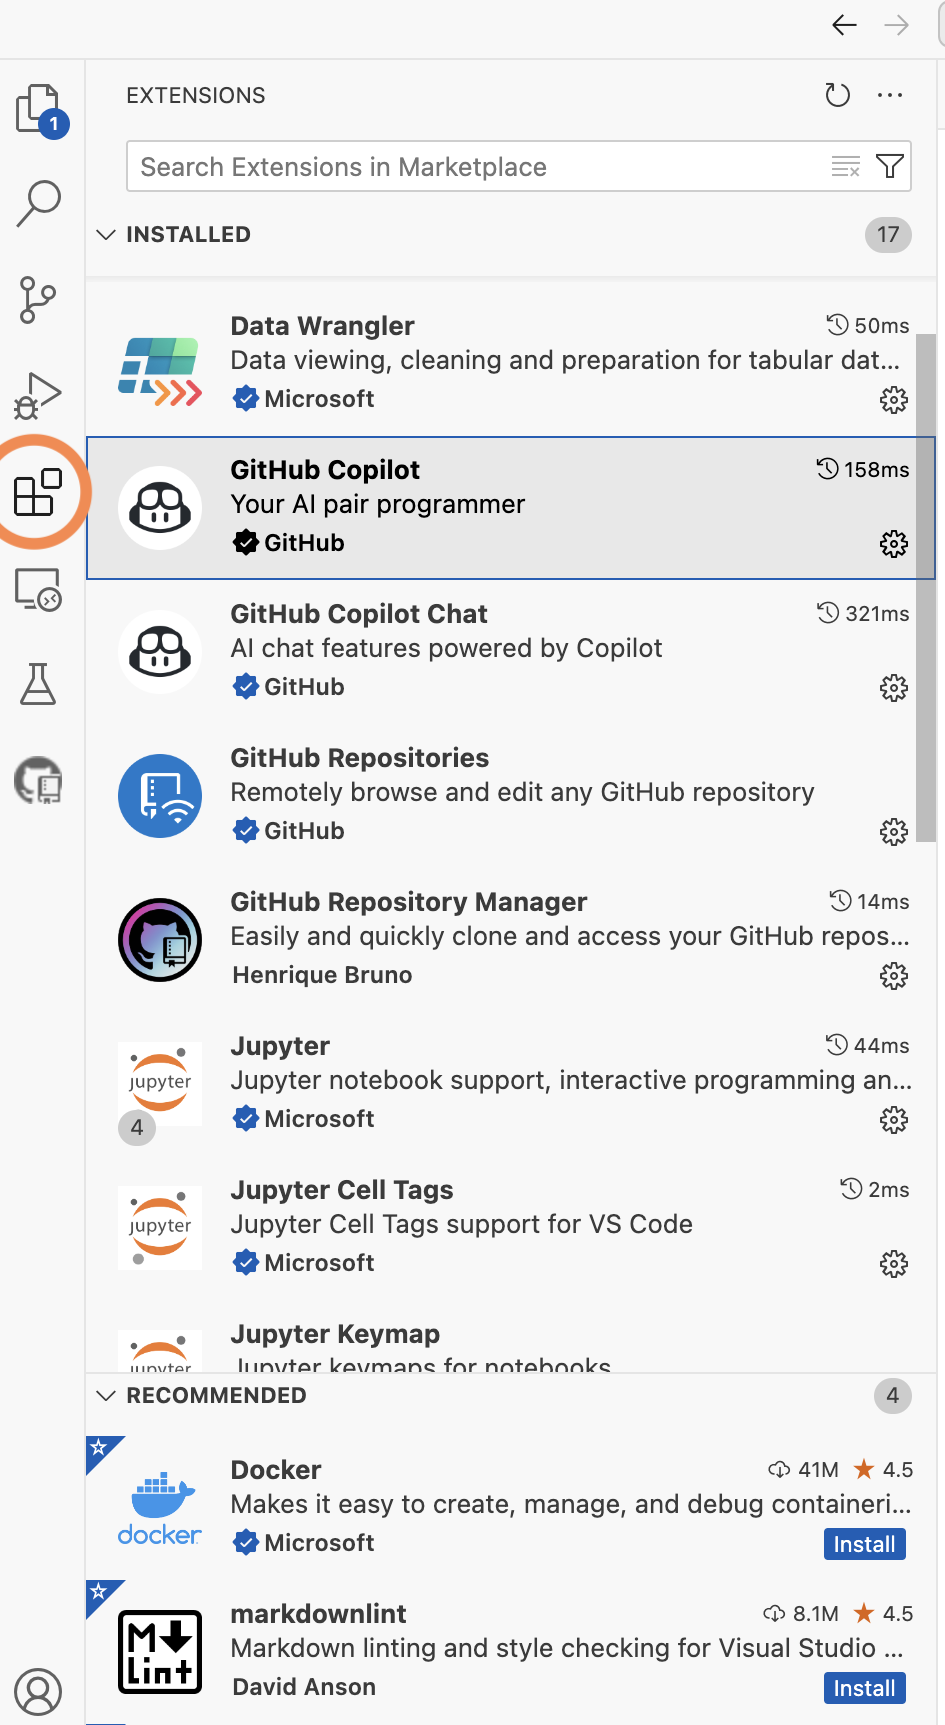
Python
PyLance - it may install with Python above, if so it will show as already installed.
Python Indent
Jupyter
Data Wrangler - a colorful viewer for .csvs and other data table formats.
GitHub Repositories - will allow you to clone, commit, and push repositories from VSCode
GitHub Copilot - an LLM for coding